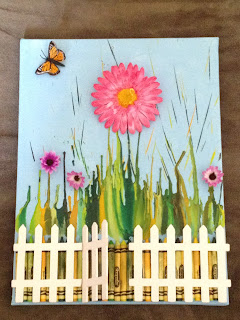
Crayon on Canvas?
I saw a simplified version of this idea posted on Pinterest, and I thought, hey, why not improve upon it?
Supplies:
Small canvas (mine is 12x18)
3 - 64-pack crayons
1 butterfly
several small craft flowers
1 large craft flower
blue craft paint
clear tacky glue
craft fencing
embossing gun
So, for me, the only thing I had to buy was the canvas and the embossing gun. I've always wanted one, so I used this as an excuse to buy it. I suppose you could use a hairdryer, but that blows much more and would be messier.
Start by washing the canvas with the blue paint. I put a silver dollar sized amount in a plastic cup and added about 1/4 cup of water. Mix it together and use a large brush to paint it on the canvas. Let dry. While it's drying, sort your crayons. It took all the yellows, greens, and some light tans from 3 boxes. Using the tacky glue (I use Eileen's clear) glue each crayon down with a strip of glue. I decided not to uniformly place the crayon labels. I thought it would look better at random. Let dry for several hours so the glue is completely dry. Turn the canvas upside down. Place newspaper around your canvas, and work in an are where dripped crayon can be scraped off. I used the newspaper, and still managed to get some on the table. With the embossing gun, begin melting the crayons. The papers will discolor slightly. Continue melting until you reach desired drip length. The wax dries pretty quickly. Be sure to trim off excess plastic on the flower backs with a wire cutter before gluing. With the tacky glue, glue down the flowers and butterfly. Measure out the lengths of fencing. Cut with wire cutters or craft knife where needed. At my son's suggestion, we made an open gate on ours. He said it looked inviting that way, like someone would want to go in and play. I thought it was cute, so we went with it. Leave the finished piece for a few hours to dry completely. In order to prop the gate open, I glued it, then placed the glue bottle under it while it dried, leaving it at the angle I wanted.
Next, I am planning to experiment with the leftover crayon color groups to make different scenes. Stay tuned!
Scarlet
Saturday, April 28, 2012
Friday, April 6, 2012
3-D Shadowbox Art from a Coloring Book!
Do your kids have a favorite coloring book they don't want to part with? A special page they colored just for you? It doesn't have to sit in a file somewhere, it can become 3-D art for your wall! With a few scraps from your craft supplies, a craft knife, sticky dots, and a deep frame, you can have a beautiful piece in no time at all.
This is a scene from Cinderella. The dress, mice and birds were cut from the coloring book page. A sheet of scrapbook paper is the background, and ribbon, paper blossoms, seed beads, and a needle complete the 3-D look. Position sticky dots to raise the parts you want raised. It's really quite simple to make a picture a treasure to keep! It's very inexpensive, completely unique, and your child will love seeing their artwork "come to life."
This one was made by my mom, who always has amazing ideas :)
Winnie the Pooh's Rabbit Ear Hat
As in the previous post with the Sally ear hat, here I made a Rabbit ear hat!
Front and back
You start with a plain black Mickey ear hat. Paint the ears with craft paint, letting dry completely between coats until no black is visible and it looks smooth. Spray with clear laquer.
Using fleece material, cover ear hat and sew down. Make ears by sketching out ear shape on fabric, sewing front sides together, leaving a little room to turn it right side out. Hand sew ears onto hat.
Sew puff ball onto the back for a fluffy tail, and use white felt for a tummy. Use yellow yarn for hair tuft on top, separating strands and brusing with a stiff-bristled brus so it becomes fluffy and doesn't look like yarn.
Stitch eyebrows onto the front for the last Rabbity touch.
Subscribe to:
Comments (Atom)


